Stucco Finish Coat Thickness: Why It Decides Whether Your Patch Disappears
If you have ever driven past a house with a stucco patch that stands out like a bandage, the problem usually traces back to one thing: stucco finish coat thickness. When a repair crew lays the finish coat on thicker or thinner than the original wall, the texture never blends, no matter how good the paint job is afterward. For Castle Rock homeowners getting quotes right now, especially those fixing cracks or water damage before a listing, understanding finish coat thickness is the fastest way to tell which crews know stucco and which ones just say yes to everything.
This guide explains what the finish coat is, how thick it should be, why thickness controls texture matching, and what to ask the crews bidding your job. By the end, you will know why one quote might be higher than another, and why the difference often comes down to whether the crew plans to match your wall or just cover the hole.
What the Finish Coat Actually Is
Traditional stucco goes on in three coats. First comes the scratch coat, a thin base layer scored with grooves so the next layer can grip. Next is the brown coat, which builds the wall out to its full depth and gets floated flat. Last comes the finish coat, sometimes called the color coat, which carries the texture and often the color you see from the street.
The finish coat is the thinnest of the three, and that is the point. It is a surface layer, not a structural one. On a typical three-coat system, the scratch and brown coats together make up most of the wall's depth, while the finish coat sits on top at roughly an eighth of an inch. That thin layer is where every texture you can name lives: knockdown, sand float, lace, dash, smooth trowel.
Here is why that matters for your repair. When someone patches a crack or a hole, the scratch and brown coats underneath are the easy part. Any competent crew can rebuild the base. The finish coat is where repairs succeed or fail visually, because that is the layer your eye reads. Get its thickness wrong and the patch shows forever.
How Thick Should Stucco Finish Coat Thickness Be?
A stucco finish coat typically runs about one eighth of an inch thick, though the right thickness for a repair is whatever matches the existing wall. Some finishes are thinner skim coats; heavy dash or lace textures carry more material. On a repair, the original wall sets the target, not a spec sheet.
That distinction trips up a lot of crews. If your home's original finish went on thin and got knocked down flat, a repair crew that trowels on a heavy finish coat will leave a patch that reads as a raised, busy rectangle on an otherwise calm wall. The material might be sound. The bond might be fine. It will still look wrong from thirty feet away, which is exactly the distance a buyer stands at during a showing.
The reverse fails too. A thin skim coat applied over a repair on a wall with heavy texture leaves a flat, smooth spot surrounded by shadow and relief. Paint cannot hide it. Texture is read by light and shadow, and shadow does not care what color you roll over it.
For context, when people ask how thick three-coat stucco is overall, the full system on a stucco finish exterior wall usually lands around seven eighths of an inch. But for texture matching purposes, only the top eighth of an inch or so does the visual work. That is the layer your repair crew has to get right.
Why Stucco Finish Coat Thickness Controls Texture Matching
Thickness controls texture because texture is just material standing at different heights. A knockdown finish is a splatter that got flattened at a specific stage of curing. A sand finish is fine aggregate floated in a thin, even layer. Additionally, a lace finish is a heavier application worked with a trowel. Change the amount of material on the wall and you change every one of those outcomes.
Think of it this way: the tools and technique matter, but the crew cannot fake the right texture with the wrong amount of mud. Applying a heavier finish coat over a wall that originally had a thin texture will always look too heavy, even if the crew uses the same trowel motion the original plasterer did. The material itself sets the ceiling on how close the match can get.
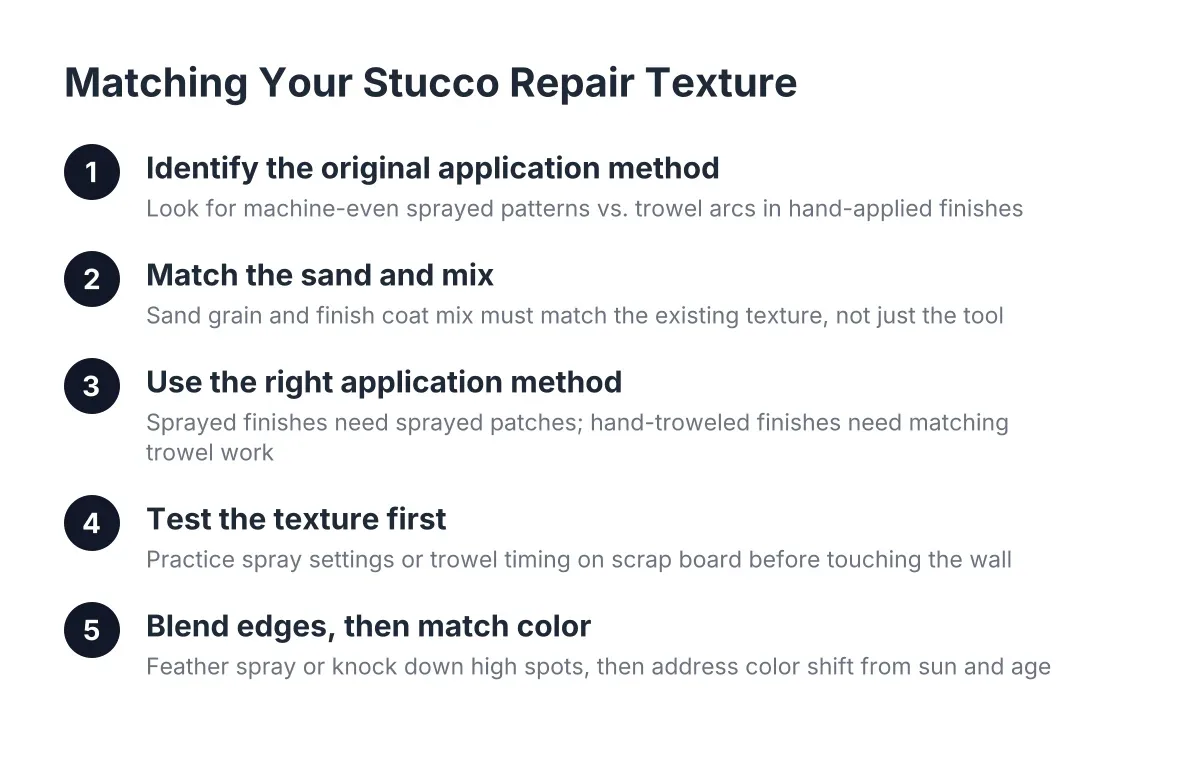
Sand size plays into this too. The fineness of the sand in the finish mix has to match the existing finish. Coarse sand in the mix forces a thicker application and a rougher surface. Fine sand allows a thinner, tighter coat. A crew that mixes the same bag of finish for every job in Castle Rock is not matching your wall; they are hoping your wall matches their bag.
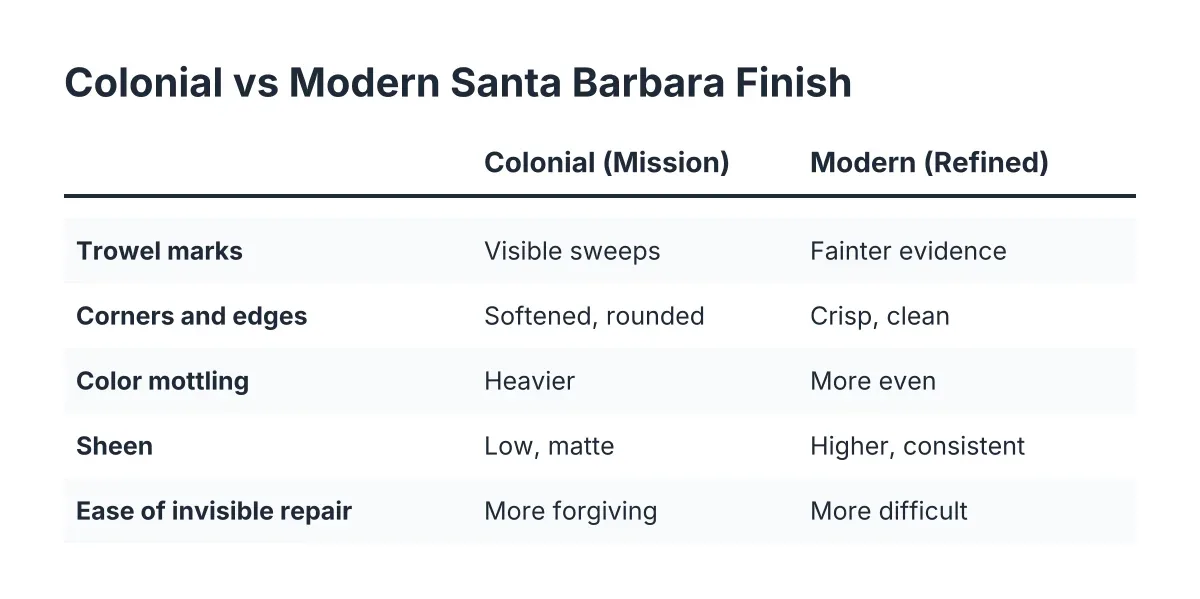
There is one piece of good news in all this. Textured, flattened finishes like knockdown are more forgiving to patch than smooth finishes. Small imperfections in a repair hide inside the existing pattern. Smooth and fine sand finishes are the hardest to patch invisibly, because there is no pattern to hide in. If your home has a smooth finish, expect matching to take more skill and more time, and expect the quotes to reflect that.
Getting Finish Coat Thickness Right During a Repair
A crew that treats matching as core to the job follows a sequence. It is not complicated, but each step exists for a reason, and skipping any of them is how patches end up visible.
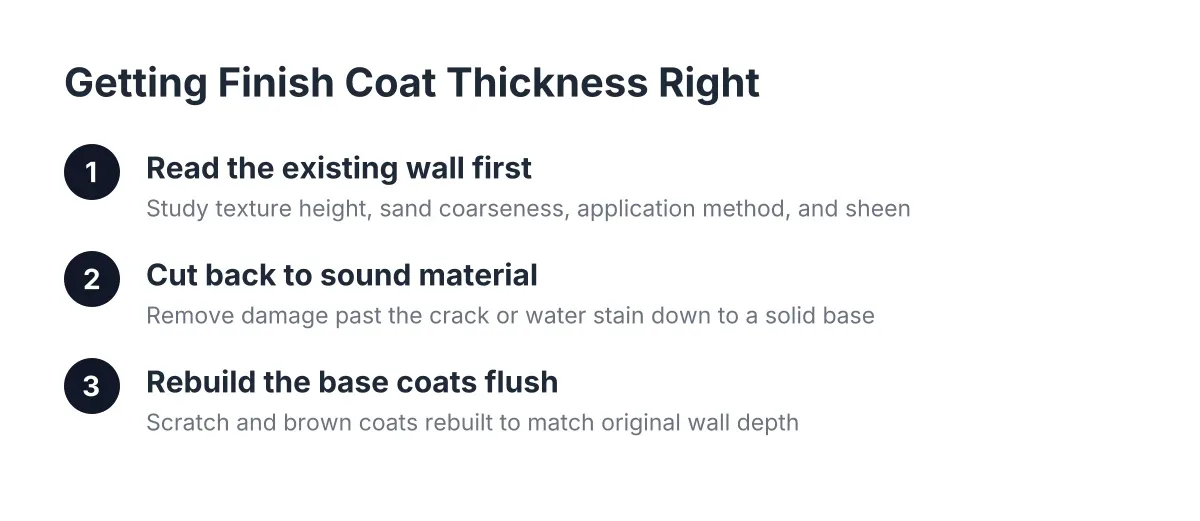
- Read the existing wall first. Before mixing anything, the crew studies the texture around the damage: how high the material stands, how coarse the sand is, whether the finish was sprayed or hand applied, and how much sheen the surface holds.
- Cut back to sound material. The damaged stucco gets removed past the crack or the water damage, down to a solid base. On water damage repairs, this often means opening more wall than the visible stain suggests.
- Rebuild the base coats flush. The scratch and brown coats get rebuilt so the repair sits at the same plane as the surrounding wall. If the base is proud or shy, no finish coat thickness will save the match.
- Match the finish mix. Sand fineness and mix consistency get chosen to match the original, not pulled from a standard recipe.
- Apply at matching thickness and technique. The finish goes on at the same weight as the original, using the same application method, then gets worked at the same stage of set.
- Blend the edges. The finish gets feathered past the patch boundary into the surrounding wall, so there is no hard line where new meets old.
Notice that finish coat thickness shows up twice in that list, once in the base coat prep and once in the application. Both matter. A perfectly matched finish over a base coat that sits an eighth of an inch too high still telegraphs as a bump when the afternoon sun rakes across the wall.
Timing matters here as well. Stucco finishes get worked while they are setting, and the window is short. Knock a texture down too early and it smears; too late and it will not flatten. A crew doing this weekly hits the window by habit. A generalist doing stucco between drywall jobs guesses.
When a Thick Patch Can Be Blended Instead of Redone
Not every mismatched patch needs full removal. If a previous repair went on too thick, a skilled crew can often knock down and scrape the high spots to bring the patch closer to the surrounding texture, then refinish the surface. That approach costs less than tearing out the base coat and starting over.
However, this only works when the base underneath is sound. If the old patch is failing, hollow, or covering unresolved water damage, blending the surface is putting paint on a problem. This is a judgment call worth leaving to someone who repairs stucco for a living; a moisture check and a few taps on the wall tell an experienced crew which path makes sense.
What Stucco Finish Coat Thickness Errors Look Like on Your Wall
If you are comparing bids because a previous repair looks bad, or you want to avoid ending up with one, here is what finish coat thickness errors look like in practice:
- A raised rectangle. The patch stands proud of the wall. The base coat was built too high, or the finish went on too heavy, or both.
- A flat, smooth window in a textured wall. The finish coat went on too thin, or as a skim coat over a wall with real relief.
- Texture that reads busier or coarser than the rest. Wrong sand size in the mix, forcing a thicker, rougher surface.
- A hard edge outlining the patch. The finish was not feathered into the surrounding wall, so the thickness change happens all at once instead of gradually.
- Sheen mismatch after painting. A thicker or denser finish coat absorbs paint differently, so the patch reflects light differently even when the texture is close.
None of these are structural problems. A visible patch is a cosmetic issue, and an ugly repair can still be a watertight one. But cosmetic is exactly what matters when you are listing a home. A buyer walking the exterior does not distinguish between a sound repair that looks bad and a bad repair; both read as deferred maintenance and both invite a lower offer or an inspection objection.
What Finish Coat Questions Reveal About a Quote
If you are gathering bids in Castle Rock right now, finish coat thickness gives you a practical way to separate stucco specialists from generalists. Ask each crew a few direct questions and listen to how they answer:
- "What texture does my house have, and how will you match it?" A stucco crew will name the finish, comment on whether it looks sprayed or hand applied, and describe their matching approach. A vague answer means matching is an afterthought.
- "How will you match the sand in the finish mix?" The right answer involves looking at your wall, not naming a product.
- "Will you feather the finish past the patch, or stop at the repair edge?" Feathering takes more time and more material. It is also the difference between a patch you can find and one you cannot.
- "What happens if the texture doesn't match on the first pass?" Honest crews acknowledge that matching sometimes takes a second pass, especially on smooth finishes. That honesty is a good sign, not a bad one.
This also explains why quotes for the same crack repair can vary widely. Suppose a homeowner in Castle Pines gets two bids to fix a three-foot crack and a fist-sized hole before listing. Say one bid comes in at $600 and the other at $1,400. The low bid may cover cutting out the damage, patching the base, and skimming a generic finish over it. The higher bid may include matching the sand, rebuilding the base flush, applying the finish at the original thickness, feathering past the patch, and returning if the match is off. In that scenario, the homeowner is not comparing two prices for the same job; they are comparing two different jobs.
Those figures are illustrative, not quotes, and your actual cost depends on the damage, the finish type, and access. The point stands either way: when one number is double the other, ask what each crew plans to do at the finish coat, because that is usually where the gap lives.
Thickness, Durability, and Colorado Weather
Finish coat thickness affects more than looks. Along the Front Range, stucco takes real abuse: freeze-thaw cycles, intense UV at altitude, and hail. Colorado logged 182,591 hail insurance claims from 2013 to 2015, the second most in the country, according to the Rocky Mountain Insurance Information Association. A single Front Range hailstorm in May 2017 caused $2.3 billion in insured damage, according to the National Insurance Crime Bureau. Exterior surfaces here do not get an easy life.
A finish coat applied at proper, even thickness sheds water and handles impact the way the system was designed to. Problems come from the extremes. A finish troweled on too thick in one pass can shrink and craze as it cures, opening fine cracks that let moisture in. A finish spread too thin leaves weak spots where hail or thermal movement wears through to the brown coat. Either way, a thickness mistake made to save time on the repair becomes the site of the next repair.
Water is the real enemy. A patch with hairline crazing from an overly thick finish coat lets moisture reach the base coats, and in Castle Rock's freeze-thaw cycles, that moisture expands and pries the repair apart from inside. What started as a cosmetic complaint becomes a water damage repair two winters later. Done at the right thickness, the same patch would have lasted as long as the original wall.
There is a trade-off worth naming honestly. Matching thickness and texture takes more time on the wall, and time is most of what you pay for in stucco repair. A cheaper bid that skips the matching work is not automatically a scam; it is a different scope. You just want to choose that scope knowingly, not discover it when the paint dries.
The Bottom Line for Your Repair
The finish coat is the thinnest layer of your stucco and the one that decides everything you see. Its thickness has to match the original wall, its sand has to match the original mix, and its edges have to feather into the surrounding surface. Get those three things right and the repair disappears. Get any of them wrong and you own a permanent outline of where the damage used to be.
Effective stucco texture matching starts before the first trowel of mud goes on, when someone stands at your wall and reads what the original plasterer did. For a Castle Rock homeowner comparing quotes in 2026, that is the tell. The crew that talks about your wall's specific finish, thickness, and sand before talking price is the crew treating the match as the job, not an afterthought. That is the repair that holds up to the weather here, and the one a buyer never notices.
If you need stucco repair, Castle Rock Stucco Pros can help.
Prefer to talk it through? Call (720) 797-8506 — a quick call is usually the fastest way to get a straight answer for your situation.