
Stucco Repair — Complete Guide
Cracked, chipped, or crumbling stucco rarely stays small, and in Castle Rock's climate it tends to get worse fast. This guide covers everything you need to know about stucco repair, from spotting the first signs of damage to understanding how proper stucco patching makes a fix disappear into the wall. You will learn how damage starts, why some patches fail within a year, and how to decide between doing the work yourself and hiring a pro. Along the way, you will find links to detailed guides on each subtopic, so you can go as deep as your situation requires. Think of this page as your starting point for fixing damaged stucco the right way.
What You'll Find in This Guide
- Stucco Exterior Patching: Texture Matching Steps That Hide Repairs Completely
- Why Stucco Patches Fail and How Professionals Make Repairs That Last
- Stucco Repair Terms Explained: A Plain-English Glossary
- How to Repair Stucco Cracks Step by Step: A Castle Rock, CO Guide
- Identifying Stucco Damage Types: 8 Cracks, Holes, and Water Signs to Know
- How to Choose the Best Stucco Repair Contractors in Castle Rock, CO
Prefer to have a pro handle it? Stucco repair is one call away.
How Stucco Damage Starts in Castle Rock Homes
Stucco is a tough material, but it lives a hard life on the Front Range. Castle Rock sits at elevation, which means intense UV exposure, big daily temperature swings, and freeze-thaw cycles that stress the material season after season. Moisture works its way into hairline cracks, freezes overnight, expands, and widens the gap. Over time, a crack you could barely see becomes one you can slide a coin into.
Hail adds another layer of risk. Colorado ranks among the hardest-hit states in the country for hail damage. In fact, the state recorded 182,591 hail insurance claims from 2013 to 2015, the second-highest total in the U.S. behind only Texas, according to the Rocky Mountain Insurance Information Association. A single storm can leave dozens of small impact chips across a stucco wall. Each chip breaks the protective surface and opens a path for water.
Beyond weather, homes themselves cause damage. Foundations settle, framing shifts, and stucco cracks along the lines of that movement. Sprinklers that spray the wall every morning saturate the lower courses. Gutters that overflow dump water down one section of siding for years. For a full breakdown of what each symptom means, see the guide to identifying stucco damage types, which walks through eight specific cracks, holes, and water signs worth knowing.
Why Early Stucco Patching Attention Pays Off
The gap between a small repair and a major one often comes down to timing. A hairline crack caught early needs a modest fix. However, the same crack left open through two or three winters can let water behind the wall, where it rots sheathing and framing you cannot see. At that point, the job shifts from surface patching to opening the wall and replacing material underneath. Water damage also tends to spread sideways and downward, so the visible stain rarely shows the full extent of the problem. With this in mind, treat any new crack, soft spot, or discoloration as a prompt to investigate, not something to watch for another year.
Why Some Repairs Fail: Stucco Patching That Lasts
Not every patch is equal. Plenty of homeowners have filled a crack with caulk or hardware-store filler, only to watch the repair crack again, bulge, or turn a different shade within months. Understanding why that happens is the single best way to avoid paying for the same fix twice.
Most failed patches share one of a few root causes. First, the repair never addressed the reason the stucco cracked. If the wall moves because the house is settling or the framing flexes, a rigid patch will crack right along the old line. Second, the patch material did not bond properly. Stucco needs a clean, sound, properly prepped surface to grip. Skipping prep, patching over loose material, or working in the wrong weather conditions all weaken that bond. Third, the cure got rushed. Stucco gains strength slowly, and a patch that dries too fast in Colorado sun and wind ends up weak and prone to shrinkage cracks. The full guide on why stucco patches fail digs into each of these failure modes and how professionals avoid them.
The Invisible Patch Standard
A lasting bond is only half the job. The other half is appearance. Stucco walls carry a texture, whether that is a sand finish, a lace pattern, or a heavy dash, and a patch that ignores it announces itself from the street. Good stucco patching reproduces both the texture and the color of the surrounding wall, so the repair vanishes once everything dries and gets paint. That takes the right tools, the right technique, and a feel for how fresh material changes as it cures. For the details, the guide on texture matching steps that hide repairs completely shows how pros blend new material into old.
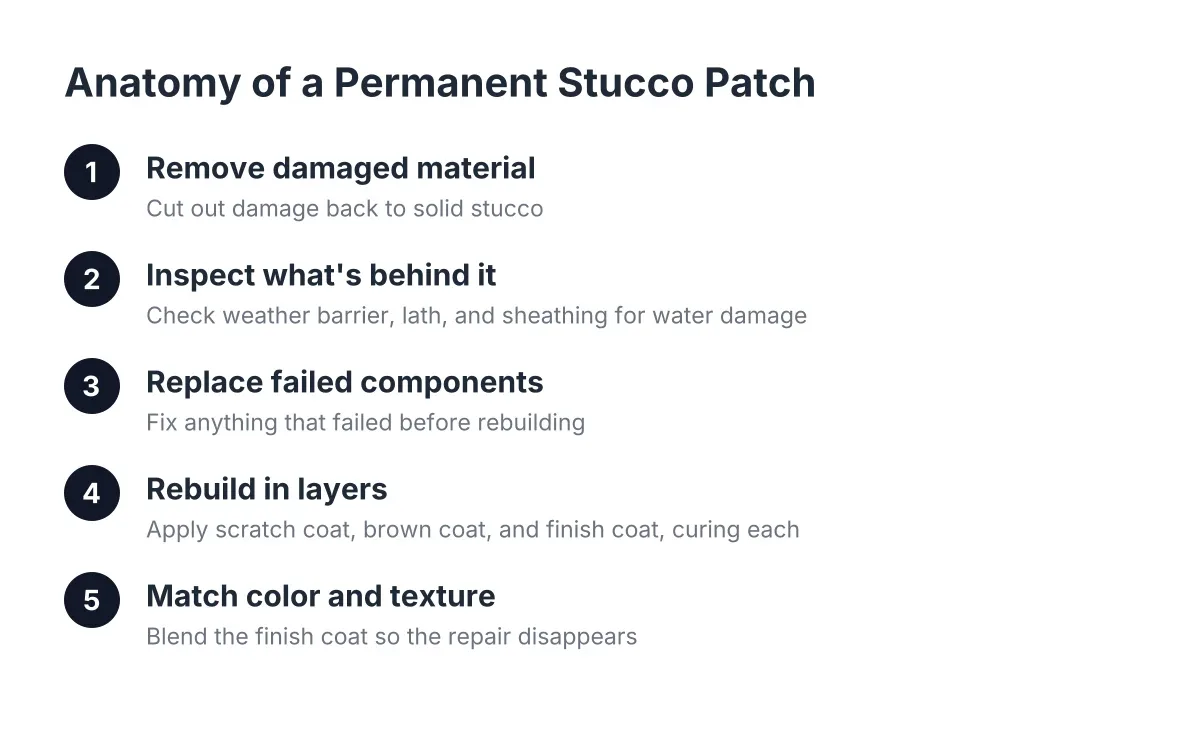
Additionally, sequence matters. A proper repair follows a consistent order: remove loose material, prep the edges, repair the underlying layers if needed, apply the patch in the correct coats, texture it, cure it, then finish it. If you want to see that process end to end, the step-by-step crack repair guide for Castle Rock homes covers the whole sequence.
DIY Stucco Repair or Hire a Pro: Making the Call
Many stucco repairs sit in a gray zone. Some are genuinely DIY-friendly, while others punish shortcuts. Knowing which category your damage falls into saves money either way.
As a general rule, small cosmetic issues are reasonable DIY candidates. A short hairline crack on a flat, easy-to-reach section of wall is a manageable weekend project if you prep carefully and follow the material's instructions. Likewise, a single small chip away from windows, corners, or roof lines carries low risk. If the worst outcome is a slightly visible patch, you can afford to learn as you go.
However, several situations call for professional help. Cracks wider than a credit card, cracks that run diagonally from window or door corners, and cracks that reappear after repair often point to movement behind the wall. Soft spots, bulges, and staining suggest water intrusion, which means the damage behind the surface may exceed what you can see. Moisture problems behind exterior walls can also lead to mold, which the EPA's mold resources cover in detail. In these cases, a patch over the surface hides the symptom while the underlying problem keeps growing.
Reading Quotes and Vetting Contractors
If you decide to hire, go in prepared. Ask whether a contractor is licensed and insured, how they plan to match your existing texture, and whether they will explain what caused the damage, not just cover it. Get the scope of work in writing, and get any warranty terms in writing too. Estimates often use trade terms like scratch coat, brown coat, and elastomeric, and the plain-English stucco repair glossary helps you read a quote line by line without guessing.
Storm season brings an extra caution. After major hail events, out-of-town crews sweep through Colorado neighborhoods, and claim fraud follows. Between 2018 and 2020, hail-related insurance claims across the U.S. rose 2% while questionable claim submissions rose 34%, according to Rocky Mountain Insurance Information Association data. As a result, it pays to verify that anyone you hire has a local presence and a reachable phone number. For a complete checklist, see the guide on choosing a stucco repair contractor in Castle Rock.
Cost is the other big question, and no honest answer fits every wall. Instead of a single number, expect the price to reflect the size and depth of the damage, how much of the wall needs opening, whether water reached the structure behind the stucco, access and height, and the difficulty of matching your specific texture and color. To put it simply, a quote that itemizes those factors tells you far more than a flat figure with no explanation.
Ready to Get Started?
We repair cracked, damaged, and aging stucco for homeowners in Castle Rock and nearby areas, handling everything from patching stucco cracks and repairs to water damage repair and color and texture matching. If you have spotted a crack, hole, or soft spot on your home's exterior, reach out by phone or send a request. Tell us what you are seeing, and we will talk through what the repair involves.